Part 1 – “Some Assembly Required”
Note: The AIY Kit is not technically necessary to run Assistant, which is outside the scope here. If you can configure a Pi with a speaker & mic, skip to the software bits.
If you’re putting it in a box, go ahead and assemble now per the instructions, but stop before the installation/configuration bit starts, since we’re going to deviate rather heavily.
If you’re not assembling the kit, put the hat on the Pi using the standoffs- the speaker connector can hit the metal shell of the HDMI connector on the Pi, which fuzzes the audio out until you reboot. Otherwise, all you really need is the microphone board and the speaker- there’s a button and LED on the hat which replicate the big button switch. Personally, I put together the big one since it’s easier to see, which is kinda nice for now. It’ll probably disappear soon though.
The big button is the only bit of hardware that isn’t self-explanatory, in that there’s no indication on where the wires should go. Looking carefully at the wire side of the assembly, there’s a crown embossed in the plastic. With the crown pointing up, the top two wires are for the LED, and location matters. White wire goes top left, black wire goes top right. The other two wires are for the switch and shouldn’t matter, but may as well connect them like the picture too, just to be safe.

At this point, it should look something like this. Isn’t it pretty?

Back to everyone
Now we’re ready to start setting things up. First things first, we need an OS. Fortunately, Google has been kind enough to provide a disk image with the OS preconfigured for the Voice Hat, and contains the basics for getting the system up and running. Right-click the link and save somewhere. https://dl.google.com/dl/aiyprojects/voice/aiyprojects-latest.img.xz
Next up, we need to burn the image to a Micro SD card. Minimum requirements is an 8GB card, but I like to go at least one size larger in case I need the extra space down the road. To burn the actual image, a lot of people seem to like Etcher, and I have to agree. It’s OS agnostic (it’ll run on anything), and does the job in just a couple of clicks. The process takes a little over 5 minutes, so be patient.

But, we’re not done yet. Open up the card in a file browser. If it gives you multiple options, you want the partition marked “boot”. It’ll look something like this:
 In this directory, create a file named “ssh” with no extension. Open up the file and put something in it, but it doesn’t matter what. I like “werfwef”, personally. This allows us to connect to the Pi via a terminal, so it’s rather important. (Note: if you have a monitor, etc hooked up this isn’t necessary, but you may as well. It’ll make things nicer down the road).
Y’all with a monitor should be presented with a shiny desktop. The rest of us have some work to do, so bear with us and pick up after the next break or three. I’ll say something.
For the rest of us, we need to get to were we can have a virtual desktop for the Pi on our PCs. To do this, we have to connect to the Pi through a command-line terminal. Ubuntu has a built-in terminal, but Windows does not have one that supports the commands we need. For Windows (of if you wanna in Linux), PuTTY is pretty much the de facto standard. Win users can download here: https://www.putty.org/ and at least for Ubuntu, it’s in the software store.
Now, I’m sure there’s a way to pre-configure the wireless connection, but I’m going to take the easy route – find an Ethernet cable and plug the Pi in. We’ll only need it for a bit, or if you want to stay wired, well, that’s up to you.
The default name of the Pi is raspberry.local with a username pi. The default password is raspberry From a terminal window, type ssh pi@raspberrypi.local or from PuTTY start a new connection type SSH, and pi@raspberrypi.local in the connection box.
 Say yes at the security prompt, and enter the password [raspberry]. If all goes well, you’ll have a command prompt
pi@raspberrypi:~ $
Which means we’re In Like Flynn!
Note: if your computer can’t connect, you’ll have to determine the physical IP address of the Pi manually. I’ve omitted this part for brevity, but usually involves finding it on your router and replacing ‘raspberry.local’ with the IP address
First things first, a little housekeeping. Raspian is Debian-based, so apt is our main install/uninstall tool. Let’s update All The Things to make sure our OS is as up-to-date as possible:
sudo apt-get update
sudo apt-get upgrade
and just say ‘yes’ when asked. (If you’re not familiar with Linux, sudo is how we ask for elevated privileges to do stuff. You may be asked to re-enter the password). This will take quite a while, as who knows how long ago this OS image was made.
Next, we meet nano, our word processor, and get the system set up to connect via Wi-Fi. At the command prompt,
sudo nano /etc/wpa_supplicant/wpa_supplicant.conf
to edit the wireless connection settings. The file is pretty sparse, so just cursor (arrow) down to the end and add your wireless credentials
network={
ssid=”network name”
psk=”password”
}
Where your info is in the quotes. The indents don’t matter in config files, but I find it helps to keep things straight. Save the file (Ctrl +X) and restart the wireless adapter:
sudo ifdown wlan0
sudo ifup wlan0
Wait a minute or so, and then
ifconfig
to list all the Ethernet junk, and you’ll get something like this:
 All we care about is ‘inet addr:’ in the wlan0 section. It’s worth noting the IP address, but really, the big thing is that pulling an IP means we’re successfully connected to the wireless network. If it didn’t work, check the wpa_supplicant.conf file and repeat these steps.
Aaand the final stretch. We need to get the remote desktop running, and a few configuration bits tidied up.
For the remote desktop, we’re using RealVNC. It’s been around for a while, and is pretty straight-forward. On the Pi, run
sudo apt-get update
sudo apt-get install realvnc-vnc-server realvnc-vnc-viewer
and go to the configuration menu to tidy up
sudo raspi-config
Where you should be faced with the configuration menu:

where there are a few things we should worry about.
First and foremost, change the password. This is a computer facing the internet after all.
Second, you can change the hostname if you like. You’ll probably have noticed that mine is named “homey” for no apparent reason.
Third, option #5, “Interfacing options”. Select that, and go down to VNC and hit enter.
Fourth, option #7, “Advanced Options” Select “A5 Resolution” and pick a nice number. This will be the resolution for your virtual desktop, so it should be smaller than your physical monitor. Also, the lower the resolution, the better the performance. I’m using 1280×720 as an okay compromise.
The Raspberry should be ready to rock, but first, we have to get some remote desktop on the PC. We’re using RealVNC here too. Installation files for the viewer can be found here: https://www.realvnc.com/en/connect/download/vnc/
Once VNC is set up, disconnect the Ethernet cable (optional if you plan to run this hard-wired) and reboot:
sudo reboot
Wait a minute or three to let the Pi boot, and bring up the VNC viewer. Create a new connection, and put in the Pi info. Unlike the terminal, just use raspberry.local (or whatever you’ve changed the name to. Leave the rest of the options to default.
 You might get asked to accept security credentials again. Go ahead and do that, and at the login screen change the user to pi, and for the password use what you changed the default on the pi to.
And voila! If all goes well, we should see the Pi’s desktop.
![]()
Back to everyone
This is where the “fun part” begins- getting all the basic Assistant set up. In this section, we’re going to test the hardware, and connect the Assistant to the cloud. At the end, we’ll be able to run a basic demo to prove out the service. We’ll work on getting something more permanent later.
First things first, let’s check the hardware. On the left-hand side of the screen are a couple of icons that look like text documents. We’ll start with the top one, which is labelled “Check Audio“. This checks that both the speaker and microphone is working. Double-click, and, it’ll open up a terminal to walk you through. I’ve done all the steps here for obfuscation purposes.
 Repeat with “Check WiFi“. I think this makes sure the Pi can connect to the Google Cloud servers. The actual text flies by pretty quickly.
This next part is probably more difficult to explain than actually do, so bear with me. With the configuration we’re using all the speech processing is done on Google’s servers, so we need to make an account there.
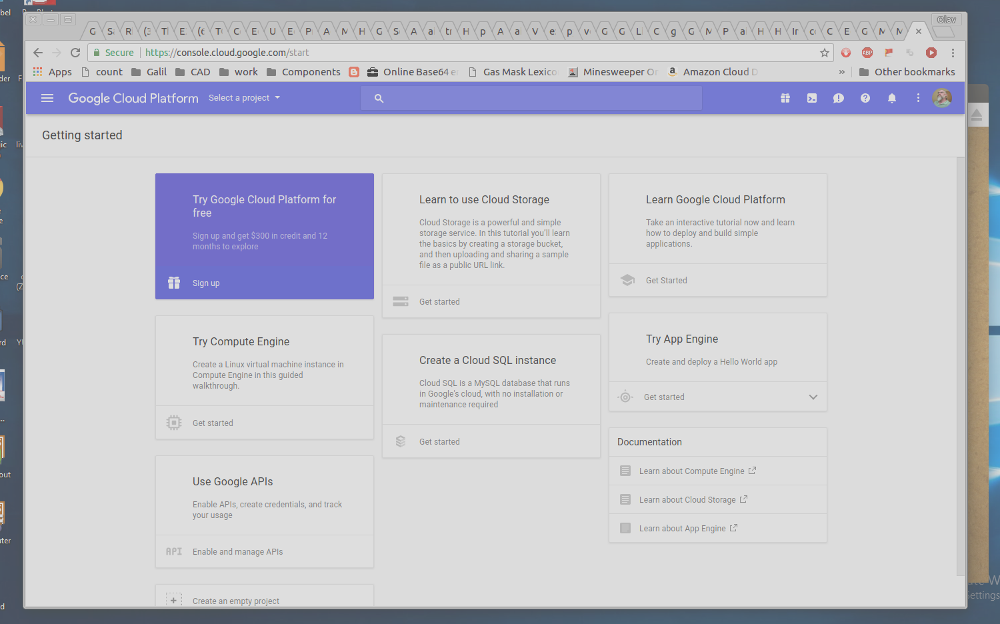
To get this set up, go to https://console.cloud.google.com . Fortunately, if you already have a Google account, the first part is done, and you can just log in. Sorta. The first time you log into the console, you’ll need to do the 2FA stuff. You do have 2-factor identification turned on, right?
This leaves you with the scary screen. This is AFAIK the same screen big companies use to access Google Cloud services, so there’s a lot more here than you’ll ever actually need.

Down towards the bottom where it says “Use Google APIs”, click the link that says “Enable and Manage APIs“. I won’t bother with the screenshot since all you need to do is hit the plus sign in the upper-right corner to create a new project. The pop-up will go away and replaced by a screen where you’re asked for a project name. Give it something memorable like “Voice Assistant” or “My Dog Loves Cheese”
Once you’ve done that, click where it says “Dashboard” and you should see something like this:
 All we care about is the “ENABLE APIS AND SERVICES” button, so click on that, and you’ll get yet another screen, which has the ten billion Google APIs. Search for “Assistant” and select the
Google Assistant API (should be the only option). From the screen that follows, click the Enable button.
This will cause the browser to whir and click for a few seconds, and you’ll be back at the dashboard for the project, but we’re Not Done Yet. The top bar of the page tells you that you need to create credentials. That’s the button in the upper-right that says, surprisingly, “Create Credentials“. We already know which one we need, which is OAuth, but it has to ask. I’ll make a special note that you’ll need to allow user data to make the soup work. So, click all the buttons like this:

And it’ll take you to a page where it says you need OAuth. Give the credentials some sort of name, continue, and you should end up here. Not much to say, but make sure the email address is yours, and give the mess a name of some kind, then continue on. You’ll get a fancy page that’ll list your ClientID as some sort of gobbledygook with a “Download” button. Do this and continue on.
While we have the browser open, there are a couple of Google profile settings that we need to have enabled to make everything work smoothly (namely, to make Assistant act like Assistant). Go to https://myaccount.google.com/activitycontrols and make sure “Web & App Activity,” “Location History,” “Device Information,” and “Voice & Audio Activity.” are all enabled.
Next, open up the file browser for a sec, and copy the file that starts with “client_secret” from the Downloads directory to the Home directory and rename it to “assistant.json“.
Thankfully, we’re done with this part. Close the file browser and web browser. You won’t need them any more. It’s time to go back to the desktop and click the middle of the buttons on the left, the “Check Cloud” one. It may not do anything, since you’ve already signed into Google on this machine. If not, it may ask- it doesn’t do anything for me anyhoo.
And it’s finally time to actually test! In the future, a standard terminal window is fine, but for ease, click the “Start Dev Terminal” icon to bring up the prompt. Start the demo with
src/assistant_library_demo.py
first thing that will happen is that a browser window will open up asking you to grant permissions to the Cloud service you created earlier. Accept the credentials, and close the browser. There will be a lot gobbledygook, and then…
Say “OK, Google” then speak, or press Ctrl+C to quit…
and the LED will start blinking slowly.
Congratulations! You have the demo running. Play with it for a while. I recommend moving your phone out of the room and turning off the mics on any Google Home or other hardware. You’ll know your Pi is listening when the LED stops blinking and turns solid. When you’re done, Ctrl+C to quit.
Note: Assistant is not running automatically at this point. To play with it, you need to run it manually with the demo above. We’ll get it running as a service next.
Now that we have all the basic configuration done, it’s a grand idea to back up the SD card in case something gets broken in the future. For details on how to make and restore SD card images, Pimylifeup has some good instructions. https://pimylifeup.com/backup-raspberry-pi/
Note: somewhere along the line (probably an update) something usually pukes and I get an error “No module named ‘google_auth_oauthlib’“. What seems to be happening is that that the Assistant demo uses it’s own Python source code, but suddenly it’s trying to use the system implementation which breaks everything. The fix, thankfully, is simple:
cd ~/AIY-voice-kit-python
source env/bin/activate
python3 src/assistant_library_demo.py
which forces the demo to use the proper Python. You’ll probably have to do the python3 line for the other demos (replace the .py script name in the command line). Hopefully this doesn’t hap pen to you, but keep it in mind just in case. Note: after you’ve run this command sequence, run the demo without the python3, e.g.: just src/assistant_library_demo.py
Next up: Setting up Voice to run as a service (automatically):
https://follandfamily.com/google-aiy-voice-kit-pt2/